HST Tutorial
I recently came across this method for constructing Half-square triangles (HSTs) by the wonderful Lynne Goldsworthy of Lily's Quilts, and wondered if I could adapt it for bigger sizes. After playing around with Illustrator and my quilter's ruler, I worked out the measurements needed, then had a play with some fabric, and couldn't believe how easy this method is. And what's even better, you don't have to trim down all those squares at the end - how many hours I have wasted!! Because this is more or less foundation piecing, your sewing is so accurate that your squares come out the size they should be, unlike the two squares together method.
I was so happy with this that I decided to write up a quick tutorial to spread the love, and also provide some free templates for different sizes. Click on the relevant size for its own PDF template - these are for finished sizes 2", 2¼", 2½”, 3”, 3½”, 4” and 4½”. If you need help with printing these at 100%, check out my how-to guide here.
As wonderful as this method is, it doesn’t work with fabric scraps or charm squares – stick to other methods for these – Amy Smart has a couple of great tutorials on her blog Diary of a Quilter. Similarly this method only works if you want quite a few HSTs in the same colourway as you will be using large pieces/strips of two fabrics at a time.
Cutting requirements;
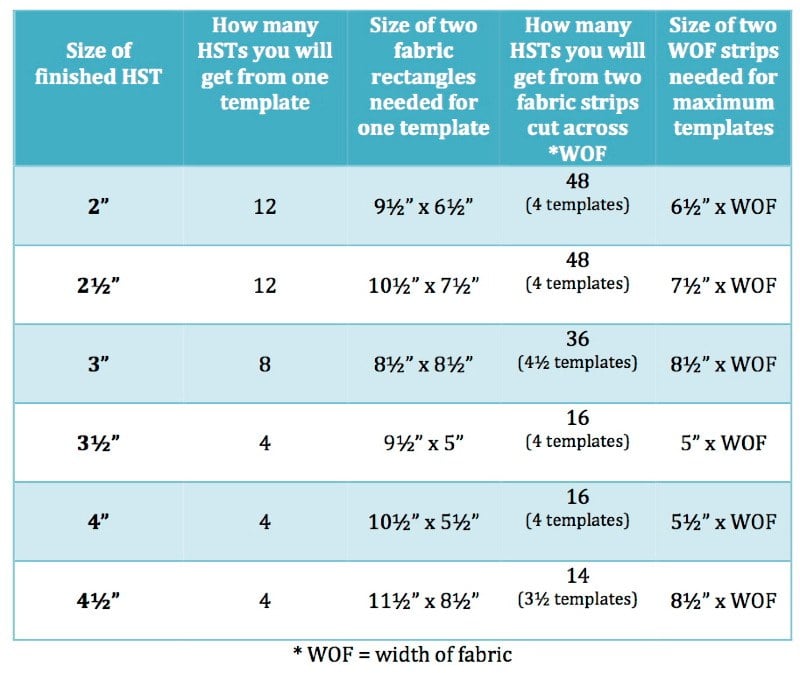
Depending on how many HSTs you need, you can either cut two rectangles of fabric for use for one template sheet, or cut two strips of fabric, cut across the width of fabric (WOF) to use with multiple templates.
Decide how many HSTs you need and refer to the table below to determine your fabric requirements.

Whether you are using one or multiple templates, the method is the same. First trim your paper templates approximately ¼” away from the templates’ edges. If you are using half templates, carefully cut down the middle line, this is part of your template so your cut needs to be as accurate as possible.
Take your two fabrics, be they rectangles or WOF strips, place right sides together, then pin your paper template on top, like so...

or... 
If you find you're getting pricked by all those pins and these strips are a little cumbersome, just cut them apart inbetween your templates.
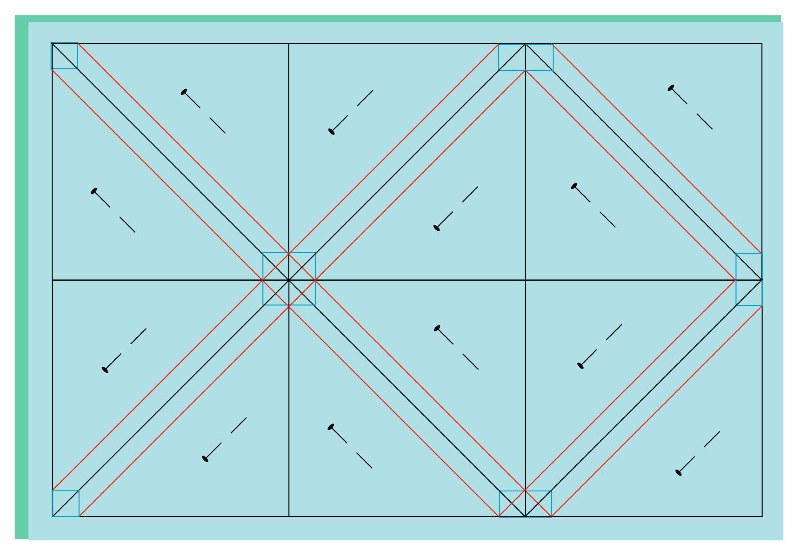
Take your stitch length down to say 1.5 (this makes it easier to take out the papers at the end) and sew along all of your RED lines, starting and ending just off your paper. You can chain piece a little here, rather than breaking thread at the end of every line, bring your needle and foot up, pull out a little thread and move onto your next red line.
Using a rotary cutter and ruler, carefully cut along of your BLACK lines, separating the squares, and then the triangles. Finally snip off those ears along the BLUE lines.

To remove the papers, fold the template’s thin seam allowance back and forth, then carefully pull it away from the stitching. Your remaining paper triangle should come away easily.
Before unfolding your HSTs, press all your seams to seal them, then opening to the dark side if appropriate, press your seams open from the font. You now have accurate HSTs that don’t need trimming! Yaay!!