Quilting Equipment
As a guide for beginners, I have listed some essential tools you will need to make your first quilt, and the many more to follow.
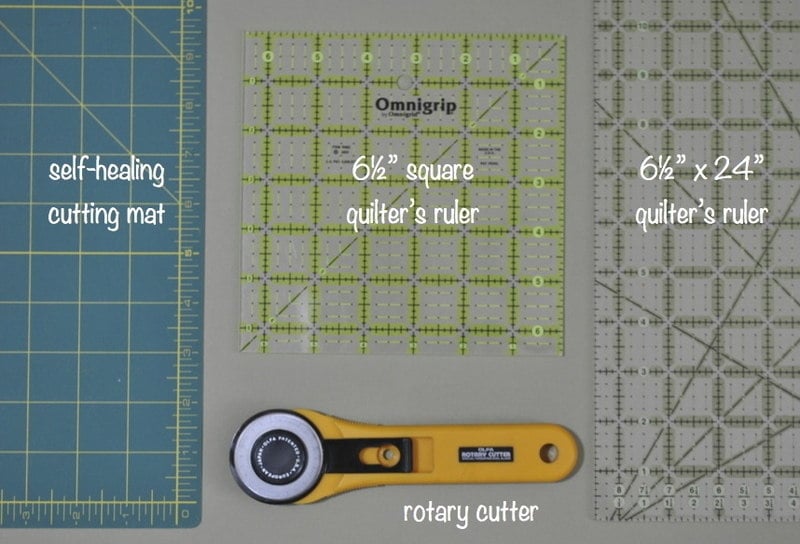
We'll begin with what I call, the holy trinity of quilting - the cutting mat, the ruler and the rotary cutter.

The self-healing cutting mat – these come in various sizes, and I suggest you get the largest one that your space will allow. I use the largest (36” x 24”) on my cutting table, and have a smaller one (24” x 17”) next to my sewing machine for any quick trimming. Also, be sure to get a mat with ¼” increments – as you will soon discover, the quilting world is an imperial one!
Quilter’s acrylic ruler – there are so many wonderful shapes and sizes of ruler available these days, from simple rectangles and 12” squares, hexagons and different angled triangles, and even to shapes for specific blocks such as the tumbler or flying geese designs. As you are just starting out, you will only need a 24” x 6½” ruler for cutting your fabric, and a 6½ ” square for trimming smaller pieces. I also have a 60degree triangle ruler, handy for easy hexagon quilts! If you find your ruler slipping when you come to cut your fabric, you can stick fabric grips - similar to circles of sandpaper - on the back of your ruler to give them more grip on the fabric.
Rotary Cutter – this very handy tool is used in conjunction with the mat and ruler, and makes quilting so much fun – not only can you cut your fabric in super quick time, much quicker than using scissors, your cuts will be all the more accurate, so piecing your blocks should be a dream! Just a note of caution, and I can’t emphasis this enough, these blades are extremely sharp, so when you're not cutting, please close the blade guard to be safe. One of the most amazing things about using this tool is that you can cut through more than one layer of fabric at a time. Now, I have read and even seen quilters cutting through as many as eight layers in one go, but I have found that the fabric can slip, so I personally have never cut through more than four layers at one time.
Now we'll go on to some other essentials tools:

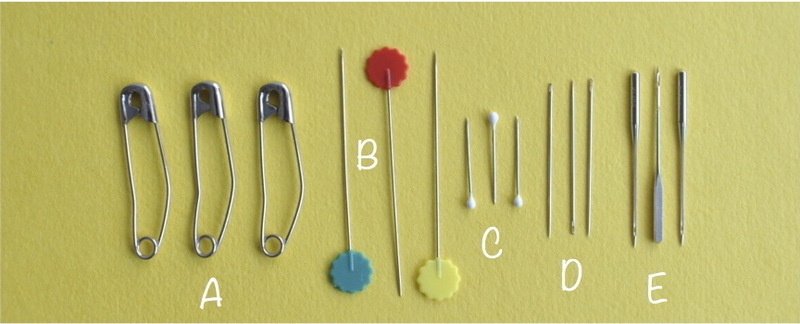
Pins – there are many types of pins on the market, each with it’s own function. I tend to use the flat-headed long pins (B) for piecing as they lay flat on the fabric with very little distortion and can be pulled out easily. Other people prefer the glass-headed pins as they ar easier to handle. I also use the tiny applique pins (C) which are great for keeping small pieces in place.
Quilter’s safety pins – these pins (A) have a curve in them that make them easier to insert when you come to baste your quilt sandwich – the backing, wadding and top – together before you quilt.
Needles – I am naughty when it comes to choices of needles and tend to use a Quilting 80/12 (E) for everything I do. This works for me, however, you should have a play yourself, if you are using a heavier weight fabric, or your quilt sandwich is particularly thick, a 90/14 needle would work best. This size needle is also used for foundation-piecing. Craftsy has a great breakdown on the anatomy of the needle here. For hand sewing, Sharps size 9 or 10 (D) are best for piecing and applique, while Betweens size 9 or 10 are best for quilting.

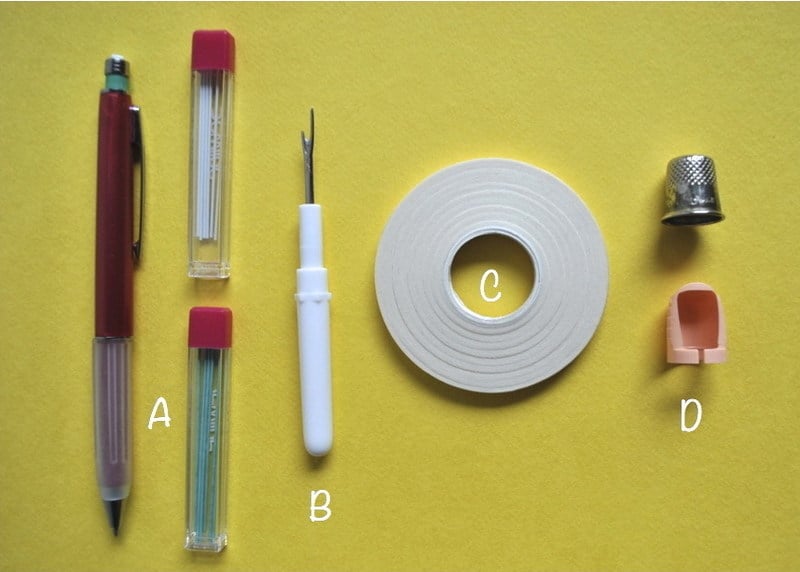
Fabric markers – Up to recently I have always used a normal HB pencil for marking the back of fabrics, which has worked fine for me, just make sure you have a fine point for accurate marking. However, I am now using Sewline’s fabric pencil (A) – as this is a mechanical pencil, not only do you always have a sharp point, you can also change the colour of the lead to contrast with the fabric you are using. Marks can be erased with a fabric eraser or a damp sponge.
Unpicker (B) – my mantra has always been – never be afraid to unpick! There really is no shame in it, so your seam has wandered slightly, your blocks don’t quite match up, no worries, unpicking should be seen as part of the sewing process. Now, I’m not saying that points that are ever so slightly out that only you will notice should be ripped out and done again. However, if you are sewing a row of squares together, and your seam allowance starts to stray, even by an eighth of an inch, by the time you get to the end, your row could be up to ½” longer than intended, which will cause problems when you come to sew your rows together.
Quilter’s Masking tape – I find this ¼” tape (C) really useful when I want to quilt straight lines onto my quilt top, I can position it where I want, sew along its edge, take it up and reposition it a couple of times before it loses its stickiness.
Thimbles (D) - to avoid getting that painful hole in your finger, I would definitely recommend using a thimble for any hand work. Try out a few different ones, I have found the plastic one above suits my finger perfectly, however, if you need one with a bit more flexibility, Clover's Protect & Grip thimble has a metal cap and a rubber body that should fit snuggly onto your finger.

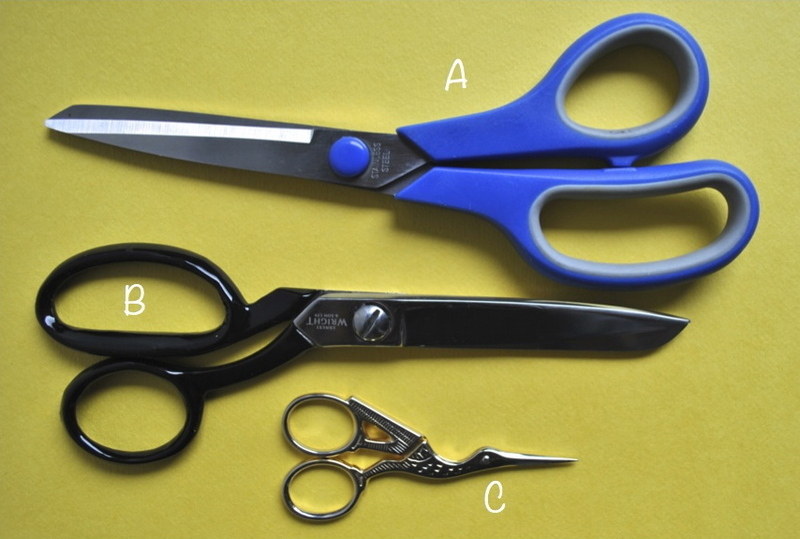
Scissors – You will need a sharp large pair of shears for cutting fabric and wadding (B), a small pair for snipping threads at the machine (C), and another pair for cutting paper (A). Do try and keep your fabric scissors away from paper, as they will blunt.