Beginner's Quilt - The Binding
This is the third and final part of my Beginner's Quilt series, if you would like to start from the beginning click here.
We're almost there, we just have the binding to go. We are going to attach a mitred binding using what I think is the most traditional and most attractive method. You can machine sew the whole binding on, but you will see you stitches on the front of the quilt, which I personally don’t like, but that’s just me.
For the binding you will need to cut ten 2½” strips from what remains of your fat quarters. Make sure you cut along the longest length of each FQ as you did for the squares. These need to be sewn into one long length, which is best to do at an angle to reduce the bulk caused by the seam.
Take one strip, and place right side up on to your machine. Take the next strip, and place face down. Now fold back the top edge of your second strip at a 45 degree angle, finger press along the crease and unfold. This is your sewing line. If you would rather mark this line with a pencil, then go ahead. Position this strip on top of your first strip at 90 degrees, and pin in place. Sew along your marked line, break thread, and open out, you now have a 45 degree seam, magic! Do the same for the remaining strips – I tend to chain piece these, so once you have sewn one strip, don’t break thread, though do raise your foot and pull the thread out slightly. Take the other end of the strip you have just attached, place face up, then place the next strip on top of this, at 90 degrees, and sew on your marked line. If you come to a strip with a selvedge edge, be sure to pin your next strip down from that edge so you avoid getting selvedge in your binding.
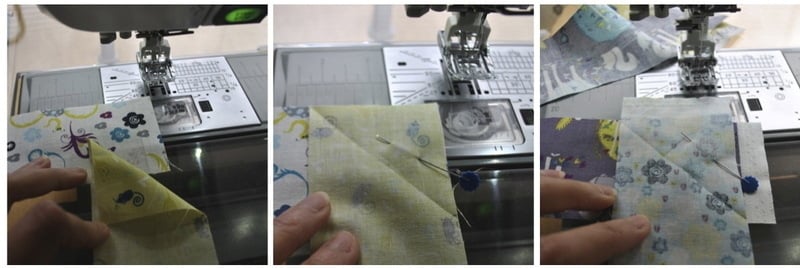
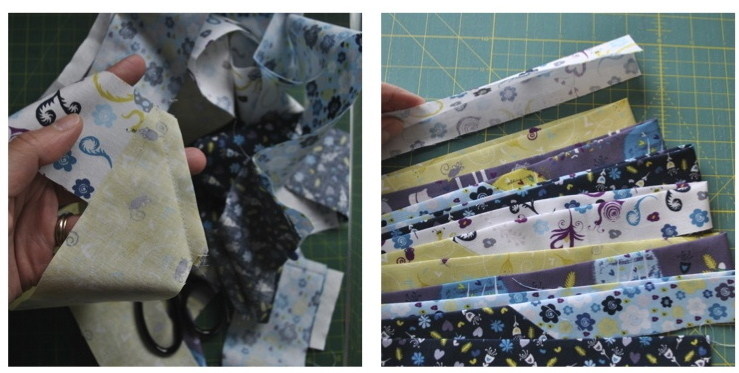
Once you’re done, snip all your threads, and trim the seam allowances to approx. ¼”.
13) Take your binding to your iron, first press your new seams open to reduce bulk, then fold your binding in half along its length and press firmly to create a nice sharp fold.
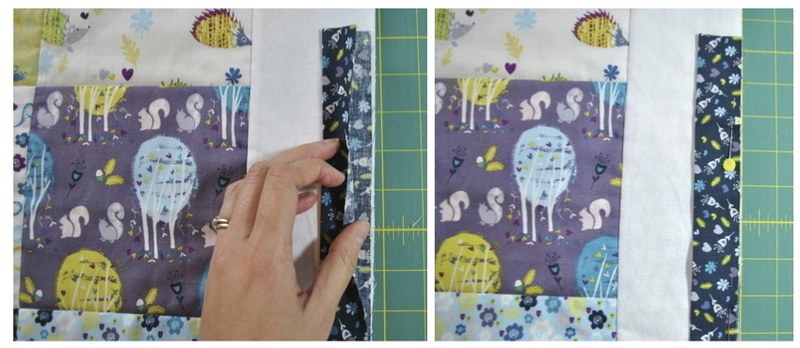
14) When deciding where to start the binding on to your quilt top, you don’t want anywhere obvious, so I wouldn’t start along the top seam. I always start my binding about a third way down on the right hand side. Place your binding’s raw edges against the raw edges of your quilt and pin into place. Carry on pinning until you get to the first corner.
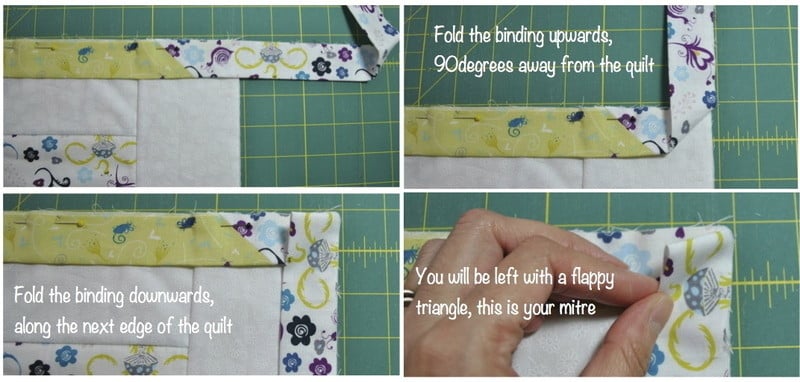
Now, to make a mitred corner – place your last pin about ½” away from the next edge, then fold your binding 90 degrees away from the quilt – now it can’t be downwards or to the left as they are towards the quilt, so it can only be upwards. Finger press this fold firmly. Now turn the binding back on itself along the next edge of your quilt, again finger press firmly. Pin into place and carry on all the way round.
15) When you come back to the beginning, place the binding on top of first end, and measure about 4” down from where the ends meet. Take the binding that’s lying on top, unfold it, and cut a rough 45 degree line across its raw edge. Fold this edge in about ¼” to give you a neat end. Move the first end of binding out of the way and lay your cut end onto the quilt, unfold it and lay your first end inside of this one, refold and pin into place. Alternatively, if you would like your binding to be a little more secure and want to sew the ends together, read this tutorial before you cut any of your binding strips down.

16) Now take your quilt back to the sewing machine. You should still be using your walking foot as this will help keep your quilt sandwich stable. Don’t start where you pinned your ends, instead start about 6” down from this join – this way, if you do have some bunching up as you sew on your binding, you can unpin your ends and reposition when you come to them. So starting far down enough not to catch either end in the sewing, lock your threads with either a couple of back stitches or a locking stitch and sew a ¼” seam down the first side of your quilt.

When you come to your first corner, holding the flappy triangle (your mitre) back out of the way, sew up to about ¼” away from the bottom edge. Back stitch and cut thread. Reposition your quilt onto the next side, again holding you mitre up out of the way, start sewing with a back stitch ¼” away from the corner. Basically, you don’t want that mitre getting caught in the sewing. Carry on to the end sewing slowly and steadily, if you find you are getting a little bunching along your binding, pull the quilt towards you, this tension will stretch the back slightly to accommodate the extra on top. You can also use a strong pin or an unpicker to feed the fabric under the walking foot as you go. Just take your time. You don’t want to let this bunching build up or it will create a very stretched look on the front. If this happens, this is a time to unpick and start again. Believe me, it will be worth it!
So when you come to the end, providing you don’t have any bunching and need to reposition your ends, just sew over the join, backstitch and break thread. If you do have slight bunching, carefully unpin your ends, pull them taut so they lay flat, repin and sew.
17) All you need to do now is hand stitch your binding onto the back of your quilt. Personally, I love this bit, not only am I at the end of my quilt, but I also love hand sewing! However, I know there are a lot of the people who are completed daunted by hand sewing, so we’ll take this bit slowly.
Turn your quilt over to the back, and start anywhere except where your ends meet - this join is less obvious if its in the middle of your sewing run. Turn the binding over to the back, and pin into place – make sure you cover the line of stitching with your binding. You only need to place a couple of pins at a time, this binding’s not going anywhere.
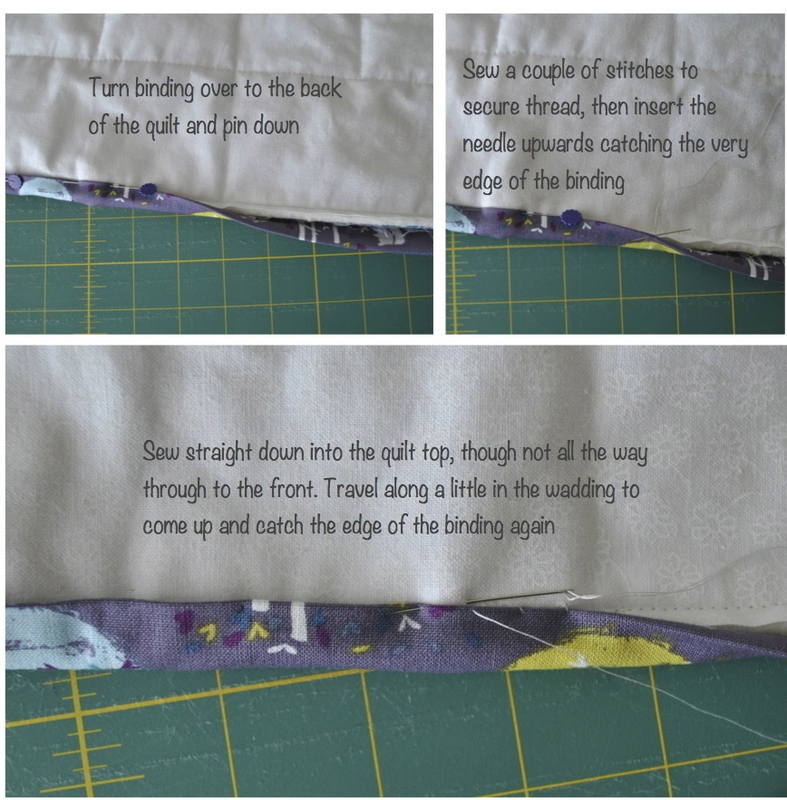
Next take a length of thread, approx. 14” long, (I used the same light grey I used in the piecing), and thread onto a needle – a sharp size 9 or 10 is best, but use something you’re comfortable with. Tie a knot at the end of your thread and sew a couple of small stitches into the seam allowance of the quilt to secure your threads. Insert the needle upwards into the very edge of your binding, then take the needle straight down into the quilt - try to not do this at an angle as the stitch will be seen - these stitches want to be as small as possible so they almost disappear! Don't go straight through to the front, instead travel about 5mm along in your wadding and bring the needle up again to catch the edge of the binding. Carry on to the end. When you run out of thread, sew a couple of stitches into the seam allowance to secure the thread and cut thread. Then start again as before. Secure thread at the end and cut.
And guess what!! You've finished your first quilt!! Well done, put that kettle on and get the biscuits out!