Fox in the Nine Patch
This really cute quilt will introduce you to the traditional nine-patch block, which together with some simple sashing and borders will see you knock up this lap quilt in no time.
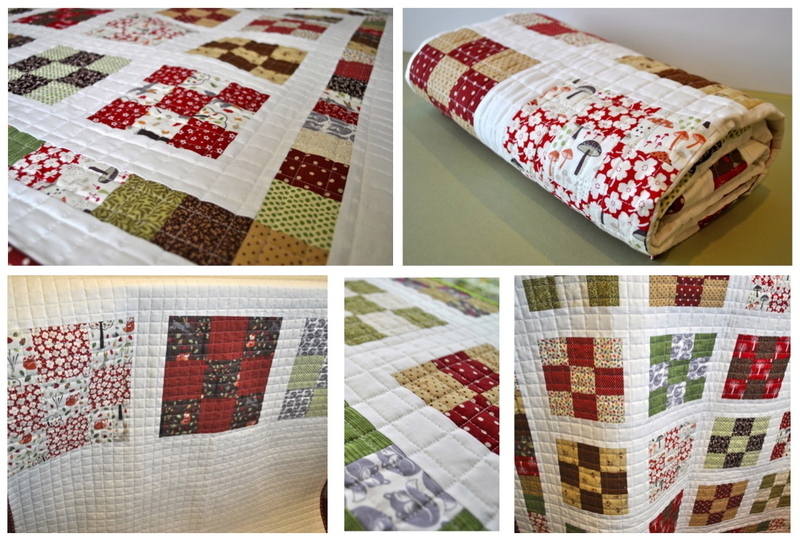
A few notes before we start:
• Read all instructions before you begin.
• WOF = width of fabric
• Seam allowances are ¼” unless otherwise stated.
• Finished quilt size is approx 42" x 50".
So for this project, you will need:
• Twenty 2½” x WOF strips of co-ordinating fabrics – this could be a 20-stripper jelly roll for a scrappy look,
or you could use 10 or even 5 fabrics, cutting 2 or 4 strips respectively from each fabric. For this quilt, I started with these gorgeous six long quarters from Lewis & Irene's Fox and Friends range, and then raided my stash for 14 more to go with them, trying my best to have a balance of light and dark fabrics. I then cut a 2½” strip from each one.

• 1m of a plain for sashing and borders
• 40cm of co-ordinating fabric for binding
• 44" x 54" (112cm x 140cm) backing and wadding
• Matching thread to piece, and thread to quilt.
The Nine-Patch Block
See How to Cut Fabric for help using the rotary cutter, mat and ruler.
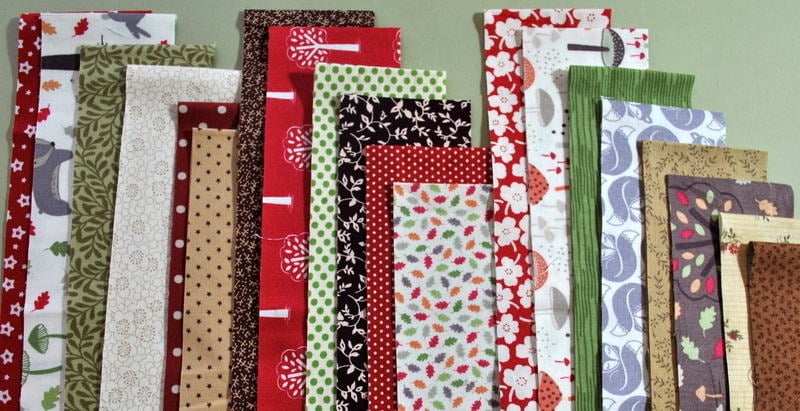
1) Take your twenty 2½” strips and match them up into pairs – try to have a light and a dark together where you can, and obviously different colours for contrast.
2) Our nine-patch blocks have five squares in one colour and four in another, which makes one colour dominate over the other. Take your first pair of 2½" strips, and decide which strip you would like to dominate in the block, if you don’t have many light fabrics in your collection, maybe have the lighter of the two strips dominate to give a more balanced feel to the quilt.
Lay both strips out onto your cutting mat, with the selvedges on the left-hand side. Trim off these selvedge edges on both strips.
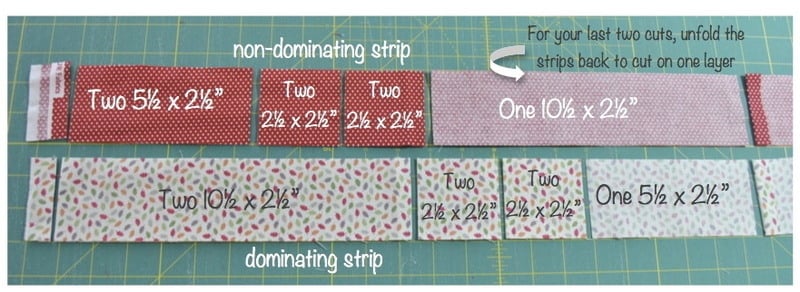
Starting with the non-dominating strip, the red one above, cutting through both layers of the strip, cut two 5½" x 2½" rectangles, and four 2½" x 2½" squares. Now move to your dominating strip, and again cutting through both layers of the strip, cut two 10½" x 2½" rectangles, and four 2½" x 2½" squares. Next, unfold both your strips so that you can cut through just one layer. From the non-dominating strip cut one 10½" x 2½" rectangle and from the dominating strip cut one 5½" x 2½" rectangle.
3) Take your three 5½" x 2½" rectangles and sew them together with the dominating pattern in the centre. Then do the same with your three 10½" x 2½" rectangles, with the non-dominating strip sandwiched between the other two. Press seams in opposite directions as below.

4) Take each of your sewn units, trim one end neatly, and cutting across the seams, cut four 2½" units from the longest unit and two from the smaller one, as below.

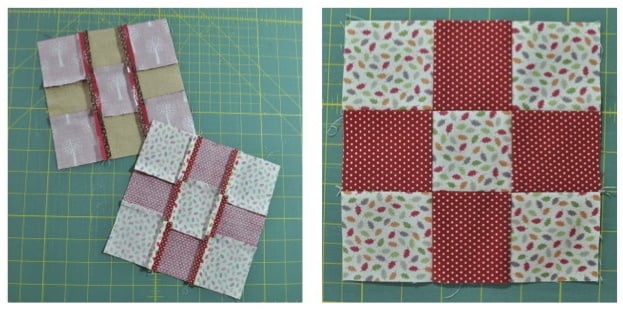
5) Once you have cut all your strips and have twenty units as above, it's time to complete your nine-patch blocks. Take the three units of your first block, lay your first row on top of your second... lock the seams together... pin into place and sew together with a ¼” seam allowance. Do the same with your third row.
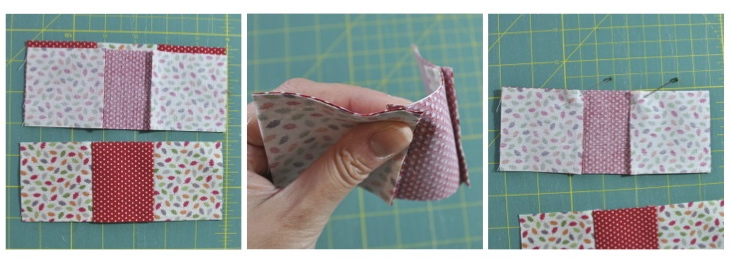
6) Press seams open to reduce the bulk. You now have your first nine-patch block, well done! Do the same with the rest of your units to make up twenty blocks in total.
The Sashing
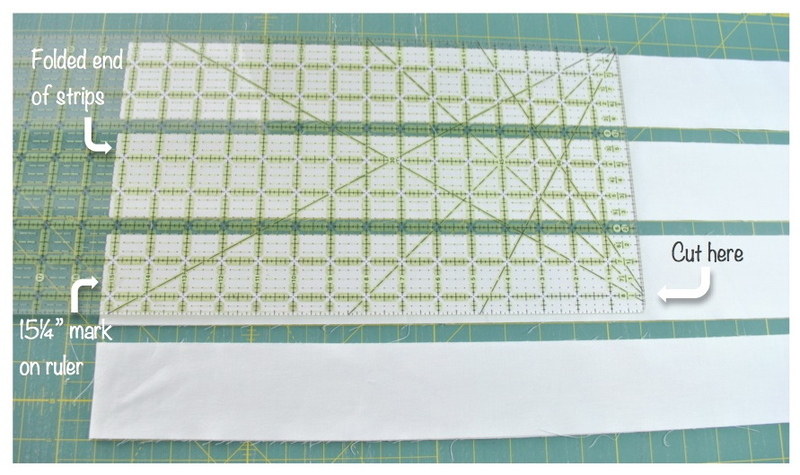 7) If your sashing fabric is a definite 44" width, you will need to cut eight 2½" strips. However, if your fabric is even slightly less, you may have to cut an extra strip for your last three 6½" rectangles.
Put two strips to one side, these are for your longest vertical sashings. Lay out three strips onto your cutting mat with the folded end on the left-hand side. Lay your ruler on top, aligning the 15¼" ruler mark (half of 30½) with the fold, cut along the right side of the ruler. This gives you three 30½" strips. Now move your ruler along to cut six 6½" x 2½" rectangles. Do the same with your remaining three sashing strips.
You should now have six 30½" x 2½" strips, and twelve 6½" x 2½" rectangles - you need 3 more of these... as mentioned above, if your sashing fabric is a definite 44" width, you should be able to get these last three rectangles from what remains of your sashing strips. If not, you will need that extra strip. Cut three more 6½" x 2½" strips and you're done cutting.
Making Up The Quilt Top
8) Find a clean surface and lay out your nine-patch blocks, you need to have four blocks across, and five down. Try and spread colour and lights/darks evenly with no similar blocks next to each other. Now place a 6½" x 2½" strip between each block, so you will have three across each row, and four down. Take a photo for reference. As we did in the Beginner's Quilt, starting on the right side of your first row, and working towards the left, place each block/rectangle on top of each other - so you will end up with the block on the far right of row one on the bottom of the pile, with the block on the far left on the top of the pile. Do this will all five rows, number them and place them next to your sewing machine.
9) We are going to sew these together as we have done in the Beginner's Quilt and All Squared Up, sewing each row together without breaking thread. Take the first block and rectangle from row one, place the 6½" x 2½" rectangle on top of the block and sew down the right side - make sure you have this placement right or it will drive you mad! Without breaking thread move on to the first block and rectangle of the second row - carry on chain piecing with all five rows.
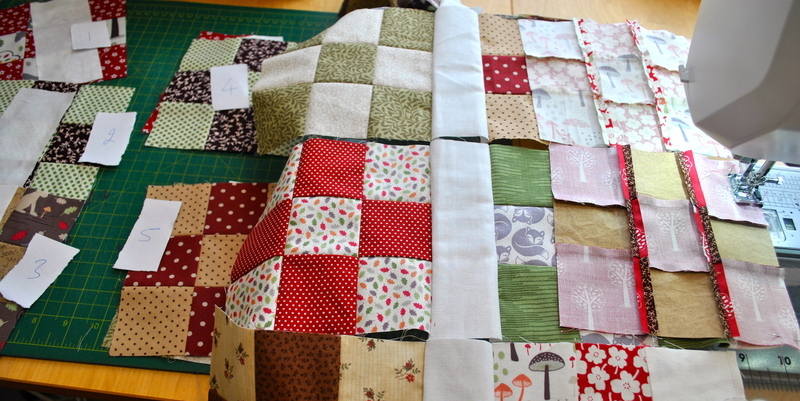
10) Once you have sewn the first block and rectangle of all five rows, pull your sewn unit back through the machine to start again with row one. Take row one's second block, place face down on top of the rectangle and sew down the right side, then move on to row two and so on.
11) Continue until you have sewn all the rows together. I have suggested you don't break thread during this process just to speed things along a bit. However, as you now need to sew a sashing strip between each block, you do have to cut those threads. So separate your rows from each other, take to your ironing board and press your seams towards the blocks.
12) Now take one of your 30½" x 2½" strips and sew onto the top of your fifth row - press seams towards the sashing. Place face up onto a flat surface such as an ironing board and place your fourth row on top, right sides together. Slightly pull the row back so that you can align the seams of the sashing with those in the row below, this will ensure your blocks are lined up straight. Pin and sew, then do the same with the next sashing strip and row three and so on. When you have all your rows in one unit, sew your last two 30½" x 2½" strips onto the top and bottom of your quilt top.

13) Press all seams toward the sashing. Now measure the length of your quilt top, it should be 42½" (if its slightly out, don't panic, just cut to your measurement). Cut your last two sashing strips - those two you put aside - down to 42½" and sew onto each side. Your centre panel is now complete, next are the two borders.
14) You will remember that when we were cutting the strips for the nine-patch blocks, we also cut some 2½" squares, 80 in fact, which fit perfectly around the outside of your quilt top. To speed up the sewing, first place you squares into pairs, again spreading out the colours, and lights and darks, chain piece these together. Then group these units into pairs and sew together, so you end up with four rows of four squares. Now sew these into one long length keeping to the same order, so row 1, 2, 3, 4, 5, then round again with row 1, 2 and so on.

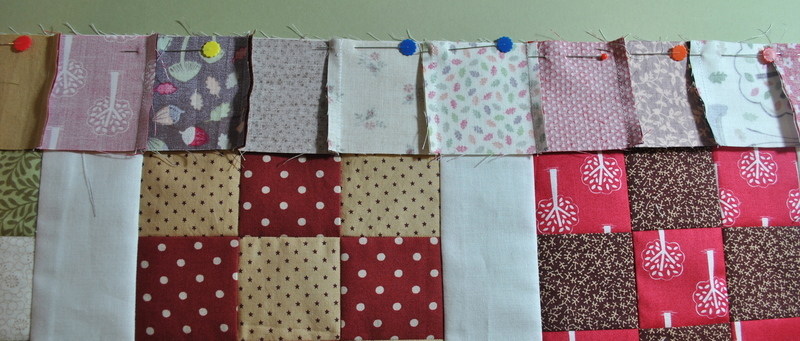 15) Starting with the top left of your quilt, pin your squared border to the sashing, lining up the seams with those on your nine-patch blocks. When you come to the end of this side, break your squared border by unpicking the two relevant squares. Sew this border into place and press the seam towards the sashing. Now take your squared border length and starting from where you left off, pin along the right hand side of your quilt top, again lining up your seams to those on your blocks. As before, break off your squared border when you come to the end of the side. Sew into place. Carry on in this way with the bottom edge and the left side. Press all seams towards the sashing.
16) Nearly there, just the last border to go. Cut five more 2½" strips from your plain fabric, sew two of these to the top and bottom of your quilt top. Now measure the full length, it should be 50½", again your top may be slightly different, just cut to your measurement. Join two of your remaining border strips together, cut this down to 50½" and sew onto one side of your top. Take what remains of your second border strip and sew onto your third strip, again cut down to 50½" and sew on to your last side, press seams towards the outer border and you've completed your quilt top, congratulations!
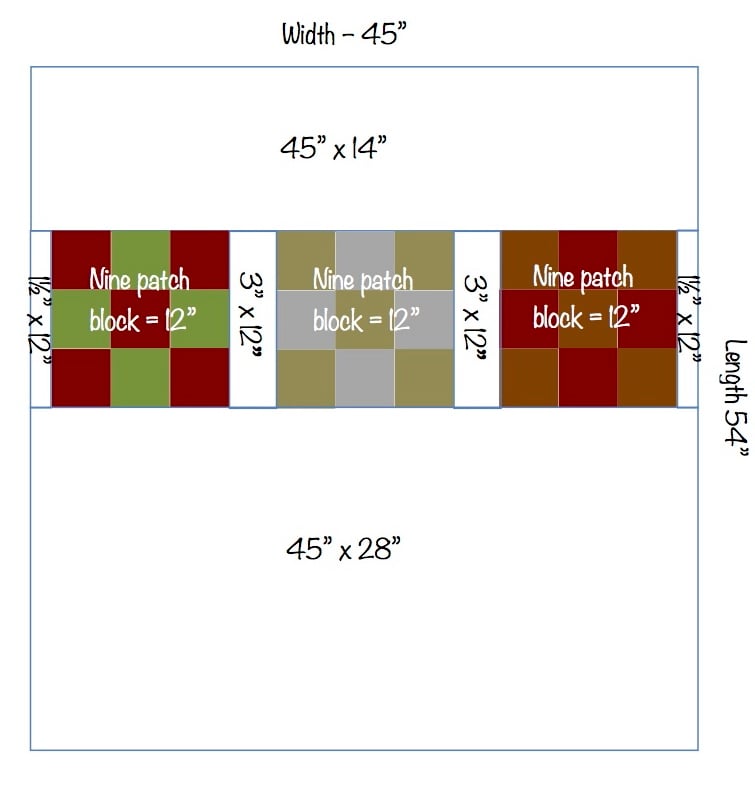
17) Now to quilt. As this quilt is only 42" wide, you should be able to get the backing out of a normal width of fabric, though you will have to be careful when basting your quilt sandwich together as you'll only have an extra two inches to play with. For more on basting your quilt sandwich, please go to here. Me being me, I decided to make up a pieced backing, as you can see below. Remember to add a ½" seam allowance to all measurements before cutting. The nine-patch blocks are made up from 4" (4½" cut) squares using some of the same fabrics as on the front, and for the white 45"x14" and 45"x28" pieces, I cut down the length of my fabric to get the 45", instead of across the width.
 18) Now the dreaded "quilt as desired", quilting really isn't as scary as some people think and really is fun, you just need to relax and take your time! My Beginner's Quilt - the Quilting has quite a comprehensive guide on stitch-in-the-ditch quilting, which would look lovely on this quilt. You could sew down each vertical and horizontal seam.
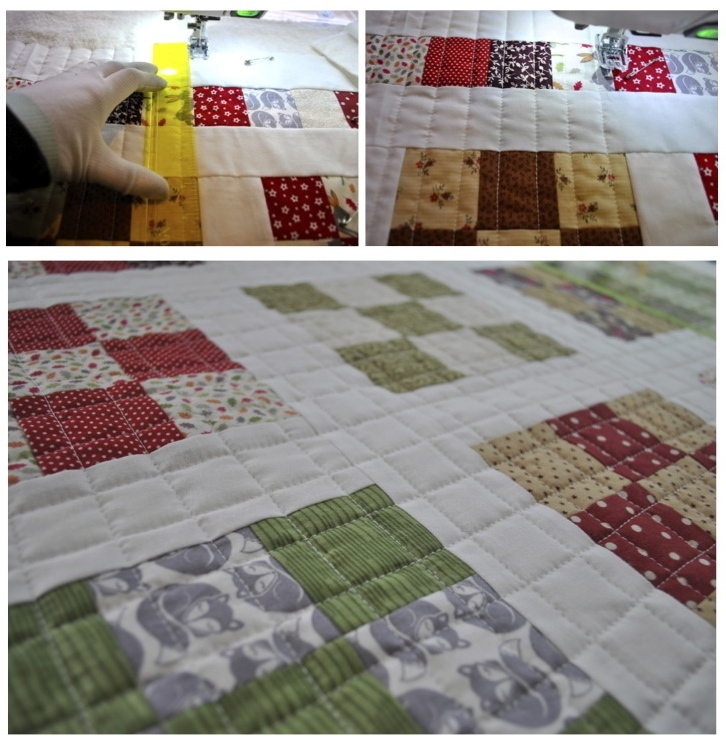
Instead of stitch-in-the-ditch, I chose to stitch ½" away from each seam, first downwards, and then across the width. I'm lucky that my walking foot is actually an inch wide, so I just had to run the outer edge of the foot along each seam. Where I didn't have a seam to follow, I placed a ruler to join the gap and ran my foot against that instead. As all the sashings and squares in the blocks are 2" wide, by following every seam, I have created a 1" grid pattern over the whole quilt, and I love it!! I used a 28weight Auriful thread which gives the quilting extra definition.
19) Once you have completed the quilting, trim all your edges neatly. Cut five 2½” x WOF strips from a co-ordinating fabric, sew together into a binding strip, and sew onto quilt. Refer to Beginner's Quilt - the Binding for more on how to do this. Sew on a label with your name and the year, and you have now completed your nine-patch quilt, congratulations!